Thursday, April 24, 2014

Pretty Nails Without the Cost


 I love going to the salon to get my nails done, I think you can agree there's nothing better than being pampered. However, around here a good manicure will put me back about $20 plus tip, every 2 weeks! Now that's just more than I am willing to pay just for a manicure. Don't get me wrong it's great getting your nails done and if you have the time and can afford the cost every two weeks go for it.

  As for me getting a manicure is really something I tend to do either for special occasions or just when I need the pampering. For the most part I opt to do my own manicures as it fits best with my budget and after many years of doing my own nails I have gotten pretty good at the craft.

Here's what you will need:


Cuticle Cutter
Nail Buffer
Acetone
Cuticle Pusher (can be wooden or metal;both pictured above)
Cotton Balls
Nail File
Base Coat
Top Coat
Cuticle Cream/Oil
A bowl of warm soapy water

Steps to Beautiful Nails:

The first thing you should do is remove any oil, left over polish etc. Using the cotton balls and acetone.

Next, using the nail file shape your nails as you desire (I prefer square with Slightly round corners). Once your done apply cuticle lotion or cuticle oil to your cuticles.

 Now go ahead and soak your hands in the bowl of warm soapy water about five to ten minutes this will soften your cuticle.


Dry your hands off and using the cuticle pusher gently push back the cuticle of each nail. Using the cuticle cutter carefully cut the excess cuticle. Once done, buff each nail and wash hands off.

The last step is to paint your beautifully clean and sculpted nails. Remember to apply a base coat, 2 layers of the desired color and a top coat. Allow nails to dry a minute or two between applications.

Now your ready to go out and show off your nails. 

Live. Laugh. Love

Michelle Marie

Wednesday, January 29, 2014

Water It Down


 I cannot begin to tell you how much I love drinking water! Yes, I really do love water. Don't get me wrong I like other drinks as well but unfortunately none of those other drinks can do what water will for you. I have recently decided to cut off all soft drinks, coffee, and high sugar juice drinks and replaced them all with only water. Soda is addicting so I understand it's hard to quit especially if you have been drinking it for years but I assure you if you quit drinking it all together you will find that not only do you have a bit more energy but you may lose some weight as well.

   I once gave up soda for an entire year many and I mean many moons ago, However, I began drinking soda again and found it hard to stop. I wasn't drinking it anywhere near as much as before but I was drinking it enough to feel bothered by it. About a week ago I drank my last cup of soda and have been drinking only water throughout the day, a gallon of water to be exact. I am super excited with the results so far: my skin is looking better (clearer and brighter), I am feeling fuller so I am snacking a lot less, and best of all I am feeling more energized. I have been reading and asking around in regards to the benefits of drinking water and the benefits are endless:
  • Lose Weight- water makes you feel full which helps make you realize that the "hunger" you were feeling was most likely "thirst". For best results drink 1 full glass (8-10oz.) of water before every meal.
  • Hydrates Skin-Water will hydrate your skin helping brighten your skin in the process and help maintain a clearer complexion.
  • Builds Muscle-Water will hydrate your muscles allowing them to work harder and longer before feeling tired.
  • Prevent Illness-Water helps promote frequent urination which help keep the kidneys working properly and flush out any toxins from your body. This will help prevent kidney infections, common colds, and even migraines.
  I know the idea of drinking water is not appealing to everyone but I assure you if you give it a week you may change your mind. Try adding fruit to add flavor to your water without adding sugar and calories. I actually like adding lemon/lime juice to my water as this gives you a lot of energy and a big surge of vitamin C. The benefits of lemon/lime water are amazing and I recommend for you to try some (best when drank first thing in the morning).

*Tips:
  • Aim to drink at least one gallon of water throughout the day. Use a water bottle at work or school to remind you and make it easier to drink the water.
  • Drink 1-2 cups of water first thing in the morning half an hour before breakfast. Water will get your system going and will allow your body to absorb more of the nutrients/vitamins from the food you consume afterwards.
So go ahead and "Water it down" tell me how you feel switching to just water?

Live. Laugh. Love.
Michelle Marie

Wednesday, January 22, 2014

Easy at Home Eyebrow Wax

  I use to get my eyebrows waxed at the salon until a few years ago the lady who was waxing my eyebrows changed my mind. She told me that I had a nice eyebrow shape and she could tell I did my own eyebrows (which I did when I was short on cash). After I left I kept thinking about what she had told me and I realized I could do my own eyebrows at home rather than paying to get them done. Now, plucking your eyebrows is not bad but it will take time and cause you more pain plucking one hair at a time. I prefer to wax as it also allows the best and easiest way to obtain the eyebrow shape you desire. 

  Below I will explain the steps on how to wax your brows easily at home saving you money and a trip to the salon. (you will thank me later ;)

  I am not a fan of liquid wax which you must heat and then apply because it's pretty messy and it is easy to make a mistake. I instead have found wax strips to be best when waxing my eyebrows. I love using the wax strips made by Sally Hansen, however they come in rectangular shapes which is not ideal for waxing eyebrows.


After much experimenting I found that I could cut the rectangle wax strip in a half moon shape by cutting from one end corner to the other in a curved shape.Once you do this you will end up with 2 pieces:

1) A crescent shape piece: this one you will use for the top of your brow.
2) A half circle piece: this one you will use for the bottom of the brow and the uni-brow area.


Steps:

* Take the 1st piece and as the directions on the box says rub it between both your hands for a few seconds to warm it up. Next, pull the piece apart this way you will have two pieces of the 1st piece (one for each eyebrow). The piece with the curve to the right will be for your right eye and the other for your left. 

* Take the strip meant for the right eyebrow (you can start with your left if you prefer) and place it right above your brow (the shape of the strip will guide you) make sure to only place it on the areas you wish to remove hair. Once you have placed the strip down rub it in place from left to right (this is the direction of the hair growth) for a few seconds. Using your pointer finger and thumb pinch the bottom right corner of the strip and pull it off quickly towards the left. You will see on the strip the hairs that were removed there may be some hairs left that the strip did not remove but you may use tweezers to get these few hairs once you are done.

* Take the 2nd piece (the one shaped like a half circle) and place it right below your eyebrow once again make sure to only place the strip where you wish to remove hair. Rub the strip from left to right and again remove the strip from right to left quickly. If you have hairs in between your eyebrows you can re-use this same strip for the middle of your brow as it should be able to lift those hairs as well. 

*Repeat these steps on the other eyebrow.

*Once you have waxed both eyebrows remove any hairs left behind using tweezers. Once you are satisfied with the shape and look of your eyebrows be sure to wash your eyebrow area using face soap to clean the area thoroughly to prevent clogged pores.

I just did my eyebrows on Sunday and they will last me about a month or two before I have to re-do them. A good tip to maintain your eyebrows groomed is to pluck any visible hairs prior to the next brow wax. You could also apply concealer and powder directly on the area to minimize the look of hairs.

Let me know how your brows look ;)

Live. Laugh. Love.
Michelle Marie

Thursday, January 16, 2014

Learn to Relax

  I typically suffer from migraines every so often and those of you who suffer from migraines may agree that finding comfort is incredibly difficult. I remember one time a few years back I got a migraine that just crept up on me. Nothing was working to alleviate the horrible throbbing pain. I was in so much discomfort I didn't know if to lay down or knock myself out (seriously). Relief finally came when I jumped in the shower with the lights off and let the hot water run over my head, neck and forehead for what seemed like hours.

  Afterwards, I remember laying in bed with the lights off and thinking to myself how I would not want to experience this pain again. Now, I won't say I haven't suffered from migraines or headaches since then but I have not had an episode that severe (knocking on wood) since that time. I realized I could lower my chances of suffering from headaches, migraines and overall body-ache by simply learning to relax. 

  Yes, I could always take pain killers and call it a day but why take unnecessary medicine when there is a natural alternative I could try first? I am not saying that simply relaxing is a cure for headaches and migraines but it sure does help alleviate pain and possibly minimize the duration of the episode. 

Here are some of the relaxation techniques that have helped me:

*A hot shower: This one is perhaps the most obvious and it really does help. The steam and hot water (not too hot) relax the blood vessels and muscles helping alleviate the pain. You should stand directly underneath the streaming water so the water falls right over your head, neck and shoulders. If you are experiencing sinus pressure allow the water to fall on your forehead and breathe in the steam.

 **Tip: Use a eucalyptus shower gel for extra relaxation. Eucalyptus has many health benefits one being a natural pain reliever. 

* Eye Mask: I cannot begin to tell you how great it feels to wear a gel eye mask while laying down. The trick is to place the mask in the freezer prior to wearing for about 15 minutes or until pretty cold but not frozen.

*Head massager: I do not know about you but I could literally fall asleep when I am at the salon. I love having my hair brushed, it's incredibly relaxing. Well a head massager (I use the head massager spider pictured above) has the same effect only better since it was designed for relaxation. I suggest laying down when using a head massager as this will help get you to a deeper relaxation state. If possible have someone else massage your head with the massager.

*Aromatherapy: I absolutely swear by aromatherapy. It works! My favorite form of aromatherapy is lotions. I love Bath and Body Works aromatherapy collection. I particularly enjoy using the stress relief Lotion which contains eucalyptus and spearmint oils. I also use the Sleep lotion from Bath and Body Works as well. I find both these lotions to be incredibly relaxing with soothing aromas. For maximum benefit I recommend rubbing either lotion on your feet and covering them with socks.

*Tea: I am a newbie when it comes to drinking tea. but I quickly became a fan when I realized all the health benefits. Every tea (green, white, black etc) has it's own health benefits so there is no denying it is incredibly good for you. A nice warm cup of tea after a warm shower can really help relax your whole body.

Let me know which techniques are your favorite?

Live. Laugh. Love.
Michelle Marie

Wednesday, January 15, 2014

Honey Mustard Salad Dressing


  I love eating salads! I mean I could eat them morning, noon and night! I usually experiment around with different veggies and prefer to make my own dressing. I recently developed a love for the taste of sweet dressings. So after mixing around different ingredients I came up with my go-to salad dressing. I mean I use this dressing as dipping sauce for my chicken and even when I am eating pretzels, it's that good. I usually pair this dressing with a spinach and cucumber salad, it's my favorite quick snack. The best part? It's super easy and fast to make.

Here is how to make my Honey Mustard Salad Dressing:

You will need:
*1 tablespoon of mustard
*2 tablespoons of honey
*1 clove of garlic (you could add more or less depending on your preference)
*A pinch of salt
*4-5 (depending on your preference) tablespoons of white vinegar 
*5 tablespoons of olive oil
*A blender (I used my magic bullet)

 Take all the ingredients and place in the blender. Blend until all ingredients have combined and the color is a medium yellow. Simply add as much as you like to your salad. I recommend a spinach salad with mozzarella and cucumbers, yum!

Let me know what you think?

Live. Laugh. Love.
Michelle Marie

Tuesday, January 14, 2014

Put Your Best Foot Forward

Have you ever felt like no matter how much you do your just not as far ahead as you would like?


 This has happened to me many times in my life. I think it's normal for us to have moments where we feel overwhelmed and like we are not accomplishing things the right way. Sometimes when I feel this way it causes me to feel as if I should just try something else, in other words: give up.

 During these moments is when I remember that old saying: "Put your best foot forward". Simply put this saying means to be/do your best during any obstacle or situation you may face. This saying inspires me to do my best and keep moving forward no matter what.

Here are a few of my own tips to help you put your best foot forward: 

*PLAN. Yes, you have to set a plan in order to know the steps you must take to achieve what you want. Success is not achieved in the spur of the moment.

*STICK TO YOUR PLAN. Many times we set a plan for ourselves and shortly afterwards we somehow lose track and are no longer on that plan.

*STOP HAVING FEAR OF FAILURE. If you ask some people why they didn't accomplish some of their goals you may be surprised to hear that they had a strong fear of failure. Remind yourself of your goals and the reasons why you want to accomplish these goals. Do not let fear of failure stop you from achieving what you want. It's normal to have a fear of failure, it has happened to the most successful people. The important thing  is to move forward past the fear. Once you do that your already one step closer to succeeding.

What motivates you?

Live.Laugh.Love.
Michelle Marie

Sunday, January 12, 2014

Simple Everyday Smokey Eye

 I love the smokey eye look and after much practice I achieved the look that has become my signature. I always have co-workers compliment my eyes and ask how I do it. Now I am no makeup expert or artist in fact I didn't begin to develop my love for makeup until perhaps 4 years ago. Now I love experimenting with different makeup brands and products.

Here I explain how to achieve a simple everyday smokey eye:


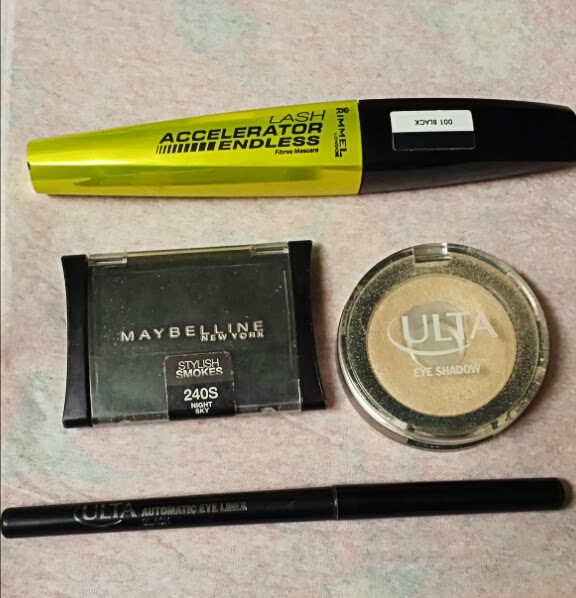
You will need four products: 
1) Black Mascara (I used Rimmel Lash Accelarator)
2) A nude barely white eye shadow (I used Ulta brand color silk)
3) Black Eye shadow (I used Maybelline Night Sky)
4) Black Eye Liner (I used Ulta Brand eyeliner) 

Before you being be sure you have applied your moisturizer and primer (I will soon make a post about primer and moisturizer). This will help the makeup go on smooth and last.

Step 1) Using an eye shadow brush take your light eye shadow and brush on your whole eye lid all the way up to beneath your brow. Brush an extra layer on your eye lid.

Step 2) Using a second eye shadow brush take your black eye shadow and brush on the crease of your eye starting from the outside in and sweep back from the inside out.

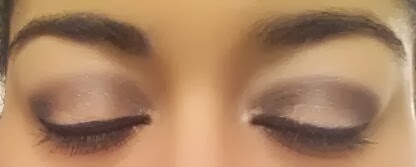
Step 3) Apply your mascara. Be sure to sweep the mascara on top and underneath the lashes to remove any light eye shadow. I do the mascara before the eyeliner because if you get some mascara on your eyelid the eyeliner will cover it up ;) Tip: I usually brush a thin layer on my eyebrows for a fuller look, you could see the difference in the pictures above.


Step 4) Apply your black eye liner to the top and bottom of the eye as pictured above.

*Here is an extra tip to glam up your look you could apply a red lip gloss or lipstick for night time. For day time you could apply a nude to pinkish red shade that will compliment your whole look. I used a lip gloss from Bare Minerals called Rouge. A small tip to maintain a glossy look with lip gloss or lipstick is to apply chap stick before applying the color. This makes a world of difference and your lips will feel soft even after the color comes off.

***I got all my makeup products at Ulta (www.ulta.com)***

Live. Laugh. Love.
Michelle Marie


Five Minute Meal

 Like me I am sure most of you have had those moments where your hungry but just not in the mood to walk into the kitchen, pull out all the pots and pans, and cook a full meal. You also may find yourself debating whether or not you should go to a drive thru just to get a quick meal but the thought of putting junk into your system holds you back. 

 I find myself in this situation quite often and sometimes I will give in to the drive thru option but then feel horrible that I did. Today I was having one of those debates with myself for lunch. Yes, I was too lazy to just go into the kitchen and prepare a full meal. However, I refused to leave the house to get a quick high calorie, high fat, high sodium meal. So, I opened my fridge and after a quick inspection viola! I put together a quick meal that was delicious and much better for me than any drive thru option. The best part? It literally took me five minutes to prepare and 3 to devour ;)


Here is my five minute meal: Turkey Rolls


you will need:
*Wraps (any kind or brand you prefer. I used spinach)
*onion (a few slices-your preference.)
*Turkey Ham
*Cheese (any kind I used Munster)
*Tomato (3-4 slices should do)
*Mustard (use as much or as little as you would like)
*Mayonnaise (as much or as little as would like) 

Step 1: Take the tortilla and spread the mayonnaise and mustard all around.

Step 2: Layer the cheese, turkey ham, tomato slices, and onion on one half of the tortilla. I layered cheese first, then turkey ham, tomatoes, and onions on top.

Step 3: Take the end where you layered the ingredients and begin to carefully roll up the tortilla. Once complete you will end up with one long roll. Mine looked like a sushi roll since it was green :)

Step 4: Cut the roll into four pieces. You could cut 4 wheels or diagonally, I cut mine diagonally.


Last Step: Enjoy! You could pair with an iced tea and some baked chips.

Let me know if you enjoyed this five minute meal.

Live. Laugh. Love.
Michelle Marie


Thursday, January 9, 2014

Hello World!

  As my very first post on my very first blog I figured I would do a small intro so you'll have an idea of who I am. This kind of reminds me of back in school on the first day when the teacher would have us all stand up one by one and introduce ourselves. I hated doing that! Simply put: I am not the best public speaker. This however, feels much better no where near as nerve wrecking ;) 

  Well, now that I have rambled let me tell you about me:

 My name is Michelle and I am 28 years old. I live in Miami, FL and am on the never ending journey of self discovery. I feel as though I am constantly discovering new things I like and realizing that what I may have liked yesterday, I don't today. For instance, I use to say I would live in Miami FOREVER! Yes, forever (at 16 the term forever seemed adequate ;). However, as I have gotten older, moved out of my mother's house, began paying bills and so forth I have realized that perhaps forever in Miami is not what I really want. I wouldn't say I know exactly where I want to be but I just know I won't be in just one place my whole life.

  I finally took the leap to start a blog because I love to write and wanted my own space where I could share my thoughts, interest, opinions, advice and so on. 

  I plan to write about anything and everything. I have a love for all things creative such as photography, art, cooking, fashion, and make-up (of course make-up I am a girl after-all ;)

  I hope you will follow my blog and fell free to ask me any questions or leave comments.

Live. Laugh. Love

Michelle Marie