Showing posts with label eyes. Show all posts

Wednesday, January 22, 2014

Easy at Home Eyebrow Wax

  I use to get my eyebrows waxed at the salon until a few years ago the lady who was waxing my eyebrows changed my mind. She told me that I had a nice eyebrow shape and she could tell I did my own eyebrows (which I did when I was short on cash). After I left I kept thinking about what she had told me and I realized I could do my own eyebrows at home rather than paying to get them done. Now, plucking your eyebrows is not bad but it will take time and cause you more pain plucking one hair at a time. I prefer to wax as it also allows the best and easiest way to obtain the eyebrow shape you desire. 

  Below I will explain the steps on how to wax your brows easily at home saving you money and a trip to the salon. (you will thank me later ;)

  I am not a fan of liquid wax which you must heat and then apply because it's pretty messy and it is easy to make a mistake. I instead have found wax strips to be best when waxing my eyebrows. I love using the wax strips made by Sally Hansen, however they come in rectangular shapes which is not ideal for waxing eyebrows.


After much experimenting I found that I could cut the rectangle wax strip in a half moon shape by cutting from one end corner to the other in a curved shape.Once you do this you will end up with 2 pieces:

1) A crescent shape piece: this one you will use for the top of your brow.
2) A half circle piece: this one you will use for the bottom of the brow and the uni-brow area.


Steps:

* Take the 1st piece and as the directions on the box says rub it between both your hands for a few seconds to warm it up. Next, pull the piece apart this way you will have two pieces of the 1st piece (one for each eyebrow). The piece with the curve to the right will be for your right eye and the other for your left. 

* Take the strip meant for the right eyebrow (you can start with your left if you prefer) and place it right above your brow (the shape of the strip will guide you) make sure to only place it on the areas you wish to remove hair. Once you have placed the strip down rub it in place from left to right (this is the direction of the hair growth) for a few seconds. Using your pointer finger and thumb pinch the bottom right corner of the strip and pull it off quickly towards the left. You will see on the strip the hairs that were removed there may be some hairs left that the strip did not remove but you may use tweezers to get these few hairs once you are done.

* Take the 2nd piece (the one shaped like a half circle) and place it right below your eyebrow once again make sure to only place the strip where you wish to remove hair. Rub the strip from left to right and again remove the strip from right to left quickly. If you have hairs in between your eyebrows you can re-use this same strip for the middle of your brow as it should be able to lift those hairs as well. 

*Repeat these steps on the other eyebrow.

*Once you have waxed both eyebrows remove any hairs left behind using tweezers. Once you are satisfied with the shape and look of your eyebrows be sure to wash your eyebrow area using face soap to clean the area thoroughly to prevent clogged pores.

I just did my eyebrows on Sunday and they will last me about a month or two before I have to re-do them. A good tip to maintain your eyebrows groomed is to pluck any visible hairs prior to the next brow wax. You could also apply concealer and powder directly on the area to minimize the look of hairs.

Let me know how your brows look ;)

Live. Laugh. Love.
Michelle Marie

Sunday, January 12, 2014

Simple Everyday Smokey Eye

 I love the smokey eye look and after much practice I achieved the look that has become my signature. I always have co-workers compliment my eyes and ask how I do it. Now I am no makeup expert or artist in fact I didn't begin to develop my love for makeup until perhaps 4 years ago. Now I love experimenting with different makeup brands and products.

Here I explain how to achieve a simple everyday smokey eye:


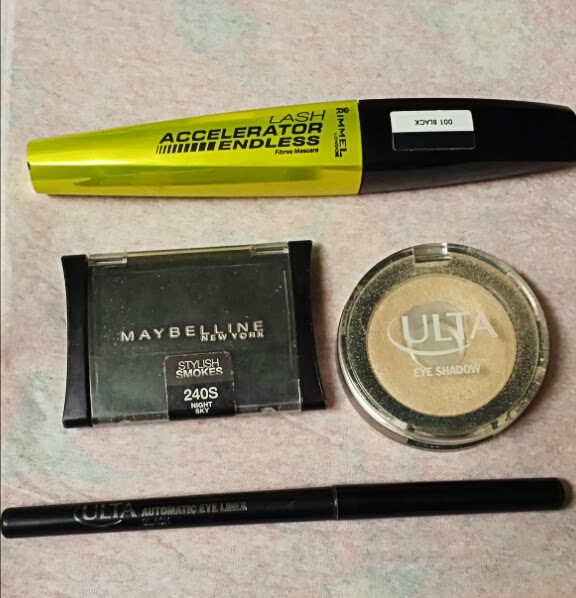
You will need four products: 
1) Black Mascara (I used Rimmel Lash Accelarator)
2) A nude barely white eye shadow (I used Ulta brand color silk)
3) Black Eye shadow (I used Maybelline Night Sky)
4) Black Eye Liner (I used Ulta Brand eyeliner) 

Before you being be sure you have applied your moisturizer and primer (I will soon make a post about primer and moisturizer). This will help the makeup go on smooth and last.

Step 1) Using an eye shadow brush take your light eye shadow and brush on your whole eye lid all the way up to beneath your brow. Brush an extra layer on your eye lid.

Step 2) Using a second eye shadow brush take your black eye shadow and brush on the crease of your eye starting from the outside in and sweep back from the inside out.

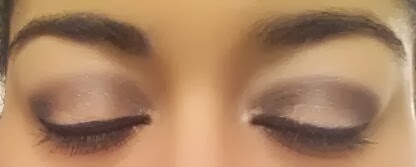
Step 3) Apply your mascara. Be sure to sweep the mascara on top and underneath the lashes to remove any light eye shadow. I do the mascara before the eyeliner because if you get some mascara on your eyelid the eyeliner will cover it up ;) Tip: I usually brush a thin layer on my eyebrows for a fuller look, you could see the difference in the pictures above.


Step 4) Apply your black eye liner to the top and bottom of the eye as pictured above.

*Here is an extra tip to glam up your look you could apply a red lip gloss or lipstick for night time. For day time you could apply a nude to pinkish red shade that will compliment your whole look. I used a lip gloss from Bare Minerals called Rouge. A small tip to maintain a glossy look with lip gloss or lipstick is to apply chap stick before applying the color. This makes a world of difference and your lips will feel soft even after the color comes off.

***I got all my makeup products at Ulta (www.ulta.com)***

Live. Laugh. Love.
Michelle Marie